


Photo by Roman Romashov on Unsplash
AWS Free Cloud Bootcamp: Instrumenting AWS X-Ray Subsegments
How to add custom X-Ray Segments for Containerised Flask Application


This article is supplemental material for Andrew's Brown AWS Free Cloud Bootcamp for Week 2 - Distributed Tracing, instrumenting X-Ray for Cruddur containerised Flask application.
How AWS X-Ray Helps With Observability
AWS X-Ray is a powerful tool that enables developers to analyze and debug distributed applications. It provides end-to-end visibility into requests as they flow through a system, identifying performance bottlenecks and errors.
Containerized applications have become increasingly popular in recent years due to their scalability, portability, and flexibility. GitPod + Docker provides a comprehensive container-based development environment, allowing developers to work on code collaboratively from anywhere in the world. However, with this added complexity comes the need for enhanced visibility and monitoring tools.
This is where AWS X-Ray comes in. Providing real-time insight into containerized applications, AWS X-Ray enables developers to quickly identify and resolve issues, reducing downtime and improving overall application performance. AWS X-Ray also integrates with the Python Flask application, Cruddur, running on GitPod + Docker, making it a great choice for developers for the application observability and latency tracing.
Enabling AWS X-Ray for Cruddur
Andrew gives up comprehensive instruction on how to instrument X-Ray in this video.
Here are the steps from my journal as I followed along:
add aws-xray-sdk library in requirement.txt to manage Python dependencies
run pip install -r requirements.txt (this command is also in .gitpod.yml for saving time when a new GitPod instance is spinning up)
add the following code to the Flask application, we named our service 'backend-flask'
     from aws_xray_sdk.core import xray_recorder
     from aws_xray_sdk.ext.flask.middleware import XRayMiddleware

     xray_url = os.getenv("AWS_XRAY_URL")
     xray_recorder.configure(service='backend-flask', dynamic_naming=xray_url)
     XRayMiddleware(app, xray_recorder)
using AWS CLI, add an X-Ray group for logging events:
     aws xray create-group \
        --group-name "Cruddur" \
        --filter-expression "service(\"backend-flask\")"
add sampling data in JSON form for X-Ray testing, then create a sampling rule using AWS CLI:
aws xray create-sampling-rule --cli-input-json file://aws/json/xray.jsonadd X-Ray daemon in docker-compose.yml:
   xray-daemon:
    image: "amazon/aws-xray-daemon"
    environment:
      AWS_ACCESS_KEY_ID: "${AWS_ACCESS_KEY_ID}"
      AWS_SECRET_ACCESS_KEY: "${AWS_SECRET_ACCESS_KEY}"
      AWS_REGION: "us-east-1"
    command:
      - "xray -o -b xray-daemon:2000"
    ports:
      - 2000:2000/udp
run this command in the terminal to start Cruddur application:
docker compose upopen the home page and interact with the application. AWS X-Ray traces shall appear within 5 minutes in the AWS Console
At this point, everything went well. However, creating segments and subsegments proved to be a challenge that I solved after class and discussed in the section below.
Instrumenting Segments and Subsegments
Problem Statement
If you faced an error while implementing an AWS X-Ray subsegment for a service called 'user activities', most probably it was the same issue I tackled in this article with an error message stating SegmentNotFoundException(MISSING_SEGMENT_MSG).
During the class we were trying to use the in_segment method to implement the AWS X-Ray subsegment, similar to the following example:
with xray_recorder.in_segment('segment_name') as segment:
    # Add metadata or annotation here if necessary
    segment.put_metadata('key', dict, 'namespace')
The user_activities service was invoked when a user hit a specific API route, and the logic was created as a separate Python script outside of the main Flask application code. We also tried to create a segment with the begin_segment example shown below from the X-Ray SDK documentation, but we got the same error.
# Start a segment
segment = xray_recorder.begin_segment('segment_name')
# Start a subsegment
Finding the Root Cause
The troubleshooting was a challenge in itself as the stack trace was very limited and didn't show which user_activities.py code line threw the error.
As a first resort, I tried using GitHub Co-Pilot and AWS CodeWhisperer to generate code using AWS X-Ray SDK. However, surprisingly, neither of the tools could solve this challenge. Co-Pilot kept repeating my code, and AWS CodeWhisperer generated links to the SDK documentation and examples that were not working during the class.
Hence, I turned to the forgotten art of reading the documentation and AWS X-Ray SDK code in the GitHub repository
After researching the X-Ray SDK code and X-Ray issues reported on GitHub for possible reasons, I was applying the 'fail fast' principle and intentionally raising exceptions to limit the problematic code scope. When the code went to the end of user_activities I realised the error most likely related to X-ray not being able to wrap up trace in segments and it must be related to closing the subsegment. This gave me enough information why the X-Ray recorder was not able to send the completed trace to AWS.
Update: after watching the additional video where Andrew solved the X-Ray subsegments challenge, the instructions below were also updated with improved tracing results. Here is the video:
Resolution
After going through the documentation and code, I was able to come up with a solution that might not be perfect, but it works.
The following changes were introduced:
following the video, I have also added a line with the capture method in the app.py which creates X-Ray subsegment for synchronous functions
[optional] added a constructor for the user_activities service to pass the request from the Flask app and record the protocol and the request URL as metadata and annotation as an exercise for creating custom annotated X-Ray subsegments. The code change for the first two steps is shown below:
    @app.route("/api/activities/@<string:handle>", methods=['GET'])
    @xray_recorder.capture('user_activities')
    def data_handle(handle):
      user_activities = UserActivities(request)
      model = user_activities.run(handle)

      if model['errors'] is not None:
        return model['errors'], 422
      else:
        return model['data'], 200
The user_activities instance will be using the same X-Ray recorder that was created in the main part of the application where the API request originated from
The run() function in the user_activities service was enhanced with a subsegment and nested subsegment, and the subsegments were successfully closed in the same order they were opened and also wrapped in try-except-finally blocks to handle exceptions which, in my case, will be streamed in Rollbar.
full code for user_activities service:
import os
from datetime import datetime, timedelta, timezone
# import XRay SDK libraries
from aws_xray_sdk.core import xray_recorder
from aws_xray_sdk.core import patch_all
from aws_xray_sdk.ext.flask.middleware import XRayMiddleware


class UserActivities:
  def __init__(self, request):
        #self.xray_recorder = xray_recorder
        self.request = request

  def run(self, user_handle):
    try:
      # Start a segment
      parent_subsegment = xray_recorder.begin_subsegment('user_activities_start')
      parent_subsegment.put_annotation('url', self.request.url)
      model = {
        'errors': None,
        'data': None
      }

      now = datetime.now(timezone.utc).astimezone()
      # Add metadata or annotation here if necessary
      xray_dict = {'now': now.isoformat()}
      parent_subsegment.put_metadata('now', xray_dict, 'user_activities')
      parent_subsegment.put_metadata('method', self.request.method, 'http')
      parent_subsegment.put_metadata('url', self.request.url, 'http')
      if user_handle == None or len(user_handle) < 1:
        model['errors'] = ['blank_user_handle']
      else:
        try:
          # Start a subsegment
          subsegment = xray_recorder.begin_subsegment('user_activities_nested_subsegment')
          now = datetime.now()
          results = [{
            'uuid': '248959df-3079-4947-b847-9e0892d1bab4',
            'handle':  'Andrew Brown',
            'message': 'Cloud is fun!',
            'created_at': (now - timedelta(days=1)).isoformat(),
            'expires_at': (now + timedelta(days=31)).isoformat()
          }]
          model['data'] = results
          xray_dict['results'] = len(model['data'])
          subsegment.put_metadata('results', xray_dict, 'user_activities')
        except Exception as e:
          # Raise the error in the segment
          raise e
        finally:
          xray_recorder.end_subsegment()
    except Exception as e:
      # Raise the error in the segment
      raise e
    finally:
      # Close the segment
      xray_recorder.end_subsegment()
    return model
Hooray!
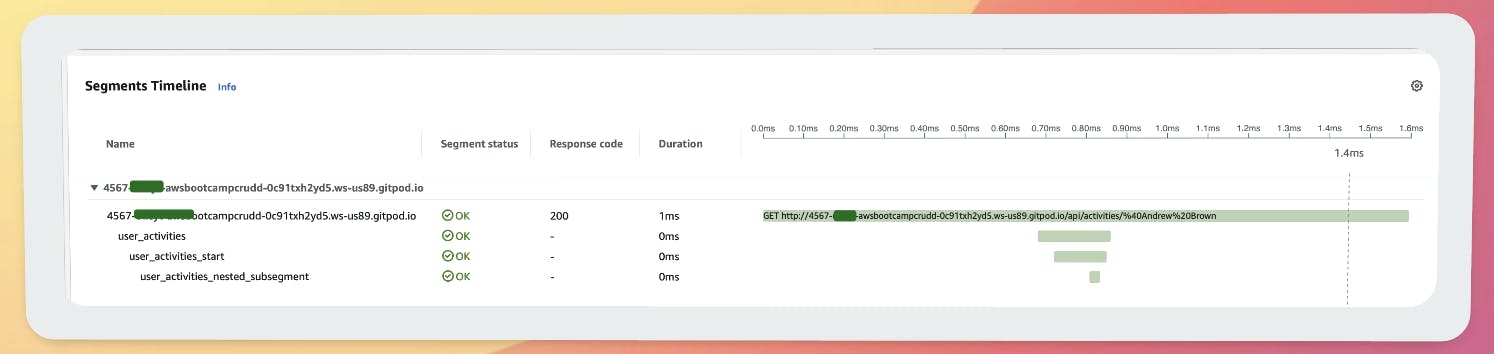
After making these changes, we could see that X-Ray traces with segments and subsegments appeared in the AWS X-Ray console, and the metadata and annotations were recorded as expected with the segment and subsegment visible:
So there you have it, boot campers! While I faced a challenge implementing an AWS X-Ray subsegment, I was able to overcome it by reading the documentation and code and making the necessary changes to our code. I hope this post helps you if you ever face a similar challenge!